Hello, World!
Table of Contents
In this series, I am going to guide you on how to create your very own blog! Yes, by the end of this tutorial, you will have a personal blog very much similar to this one up and running. If you so wish, you can use your new understanding to further customize it to make it more personal.
For your referrence, below is a list of the articles I have included in this series:
- Chapter 1: Hello, World!
- Chapter 2: Working with Templates
- Chapter 3: Flask Web Forms
- Chapter 4: Introduction to Database
- Chapter 5: Displaying User Comments
- Chapter 6: Styled Application
- Chapter 7: Working with Dates and Time
If you enjoy this article, please consider supporting my work and

The completed project used in this article can be referenced here.
You will learn how to use Python and the Flask web framework to build a personal blog. For this reason, you need to ensure you have Python installed.
Install Python
How do you know whether you have Python installed in your computer? Open your terminal and type
$ which python3
If you do not get any output displayed on your terminal, that means that you do not have Python installed in your system. You need to install it. Visit the Python Official Site and install the latest release according to your system. The three major systems include Windows, Linux and Mac OS X.
However, if you get something like:
$ which python3

# Output
/usr/bin/python3
This means you have Python3 in your system. To make sure your Python installation is functional, run python3 in your terminal as below:
$ python3

# Output
Python 3.8.5 (default, Jul 28 2020, 12:59:40)
[GCC 9.3.0] on linux
Type "help", "copyright", "credits" or "license" for more information.
>>>
The Python interpreter is in an interactive prompt where you can type in Python statements. But for now, we won’t type in anything. We wanted to make sure that the interpreter is working well.
Type in exit() and press Enter to exit the interpreter. Alternatively, press ctrl + Z.
I recommend that you have Ubuntu as your main Operating System as you start this Web Development journey. Ubuntu, a distribution of Linux, is optimized for development and it takes a creator approach rather having you as a consumer of the Operating System. It comes preinstalled with Python. That means you do not need to install it again.
To install Ubuntu, you will need to create an Ubuntu Bootable USB stick. Learn how to create a bootable USB stick on Windows or on Ubuntu. With this Bootable USB stick, you can:
- Install or upgrade Ubuntu
- Test out the Ubuntu desktop experience without touching your PC configuration
- Boot into Ubuntu on a borrowed machine or from an internet cafe
- Use tools installed by default on the USB stick to repair or fix a broken configuration
Install Flask
Python3 comes with a tool called pip3 which does all the installation of Python packages. Python has an official and public Python Package repository called PyPI(Python Package Index) from where anybody can install Python packages.
To install a package on your machine, all you need to do is:
$ pip3 install <package-name>
Note that if your Python interpreter is installed globally in your machine for all users, chances are your regular user account will not have the permission to make modifications to it. The only way to overcome this is to run the installation as an administrator using the sudo command. From there onwards, the installed package will be available to everyone.
Whenever you are working on a project, chances are your project will have multiple versions. Think about this, you have just finished a project using flask's version 0.1. By the time you want to start another project, another version of flask, say version 0.2 is released. Obviously, you will install version 0.2 of flask to keep your project current.
This may go on and on, not just with flask but maybe with another package. What you will end up with is your computer will have mutliple versions of packages. To keep your computer system clean, it is recommended that you create something called virtual environments. A virtual environment is a complete copy of the Python interpreter. The envrionments help isolate your development needs from that of your machine, and, therefore, helps to keep your system very clean and uncluttered.
Getting Started
Let us start by creating a directory that will host all our project files. I will call this directory personal_blog.
$ mkdir personal_blog # mkdir (short for make directory) command is used to create an empty directory
With an empty project directory created, we need to move into it:
$ cd personal_blog # cd (change directory)command is used to change one directory from another
Creating a Virtual Environment
There are two ways you can use to create a virtual environment:
- Manual way
- Using virtualenv wrapper
Manual way
$ python3 -m venv venv
Here, we are asking Python to run the venv package which creates virtual environment called venv.

After the command completes, you are going to have a directory called venv where all your virtual environment will be saved.
With your virtual environment created, you have to tell your system that you want to use it. This is done by activating it. To activate your new virtual environment, run:
$ source venv/bin/activate

# your terminal will change to something like:
(venv) $ ...
Using Virtual Environment Wrappers
virtualenvwrapper is a set of extensions to virtualenv tool. The extensions include wrappers for creating and deleting virtual environments and otherwise managing our development workflow, making it easier to work on more than one project at a time without introducing conflicts in their dependencies.
I personally prefer using virtualenvwrapper due to how easy it is to use. During creation of virtual environments, it not only creates but it also activates it automatically.
For example, to create a virtual environment called venv, all I need to do is run the mkvirtualenv command to create and activate the new environment:
$ mkvirtualenv venv

# Seen on the terminal:
(venv) $ ...
If you would like to use virtualenvwrapper, learn how to install and use it here.
Install Flask
We will use pip3 to install flask:
$ pip3 install flask
If you get a soft warning in your terminal informing you that there is an available update, do not panic. All you need to do is read the warning message carefully to understand what it is telling you. Typically, all warning and error messages provide suggestions on what you can do about them. In our case here, all we need to do is run:
$ python -m pip install --upgrade pip
This will make the update and get rid of the warning message. This warning message tends to only come when you install a new virtual environment.
Confirm that your virtual environment has flask installed by running your Python interpreter and importing it:
$ python3 # run your Python interpreter
>>> import flask
>>>
If you do not get any error, it means your flask extension was installed well. You can also check the version of flask installed. Run:
$ flask --version # ensure you exited the Python interpreter above by pressing ctrl + Z
Hello World Application
The Flask Documentation is a great resource to help you get started with Python and Flask. Occassionally, you can refer to it to learn more. Below, I am going to show you how you will create the structure of your project. Your application will exist as a package, with files and sub-folders in it.
Let us go ahead and create a sub directory called app:
(venv) mkdir app # remember you are in the personal blog project folder already
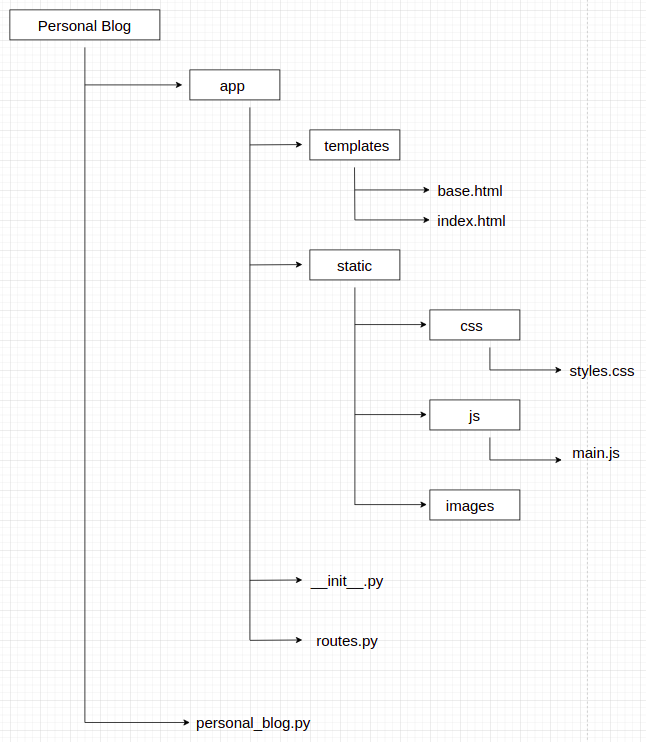
This folder will contain:
- __init__.py : it is used to define our app
- routes.py : it will bear all the view functions and URLs that will help redirect us
- templates sub-folder : all HTML files will be here
- static subfolder : it will contain css and js subfolders that will host our styles files and our JS file
In Python, a sub-directory that includes a __init__.py file is considered a package, and can be imported. When you import a package, the __init__.py executes and defines what symbols the package exposes to the outside world.
Let us add all the other files and sub-folders:
(venv) $ cd app # move into the app folder
(venv) $ touch routes.py # touch command creates an empty file
(venv) $ mkdir templates static # I have combined both templates in one command
(venv) $ touch templates/base.html templates/index.html # this creates two empty files in the templates sub-folder
(venv) $ mkdir static/css static/images static/js # three sub-folders are created inside the static folder
(venv) $ touch static/css/styles.css
(venv) $ touch static/js/main.js
Everything is now created and well set up. Over the other articles, we will use the images, css and js sub-folders, but for now, we will not need them. So, we will disregard them for a while.
The __init__.py file is going to contain the following code:
app/__init__.py: Register your flask extension in the application
from flask import Flask

app = Flask(__name__)

from app import routes
Above, we have created the application object as an instance of the flask package. The __name__ variable passed to the Flask class is a Python pre-defined variable, which is set to the name of the module in which it is used. Flask uses the location of this module as a starting point when it needs to load certain resources such as template files.
The application also imports the routes module from the application instance.
It might be confusing at first that there are two instance of app. The app variable in app = Flask(__name__) is an instance of the class Flask which makes it a member of the app package. The second app is the app directory name, from which we are importing the routes module.
Another strange thing is that routes is imported at the bottom rather than at the top of the script. The bottom import is a walkaround to circular imports, a common problem with Flask applications.
As earlier mentioned, routes are the different URLs that the application implements. In Flask, Python functions are responsible for handling application routes, hence their name view functions. These view functions can be mapped to one or more URLS.
We will create our very first view function as seen below:
app/routes.py: Home page route
from app import app

@app.route('/')
@app.route('/home')
def home():
    return 'Hello, world!'
The name of our view function is called home. It handles two URLs which are associated with it, that is / and /home. To implement these two URLs, we have utilized the @app.route decorator. A decorator is primarily used to associate a URL with a given view function. What this means is that when a web browser requests for either of the two URLs, Flask is going to invoke the home function and pass the return value back to the browser as a response.
We then need to import the application instance in the top-level file personal_blog.py as seen below:
$ from app import app
Again, we see that two apps have been used together. The statement above simply imports the app variable from the app package (this is the folder that contains __init__.py)
And that is pretty much it! You have just completed making your first Flask web application! To see it work, run these commands in your terminal:
$ export FLASK_APP=personal_blog.py # our application is registered here
$ flask run # this runs the flask server
You will see a URL generated in the terminal. The flask run command indicates that the server is running on IP address 127.0.0.1, which is always the address of your computer. A simpler name to this IP Address is localhost.
Applications deployed to production web servers typically listen on port 443, or sometimes port 80 if they do not implement encryption, whose access (to these ports) require administration rights. But in development, Flask uses the freely available port 5000.
Now, open your browser and enter the following URL in the address bar:
http://localhost:5000/

# Alternatively, you can use:
# http://localhost:5000/home

You can see from above that the browser requesting for one of the two URLs which are mapped to the home view function, returning the string Hello, world!. If you try to enter any other URL, you will get an error since these are the only two URLs recognized by the application.
You have probably noted that the moment you ran flask run command, you saw:
(venv) $ flask run

# Output
* Tip: There are .env or .flaskenv files present. Do "pip install python-dotenv" to use them.
* Serving Flask app "personal_blog.py"
* Environment: production
    WARNING: This is a development server. Do not use it in a production deployment.
    Use a production WSGI server instead.
* Debug mode: off
* Running on http://127.0.0.1:5000/ (Press CTRL+C to quit)
Every time you need to see your application, you will need to run both of these commands:
(venv) $ export FLASK_APP=personal_blog.py
(venv) $ flask run
FLASK_APP is an environment variable. If you close your terminal, and re-open it, your Flask application will not remember any environment variable. That means you will have to type in the above commands all over again. And this is not the only environment variable you will use. So, imagine how many you need to remember in order to run your application.
Thankfully, there is a way around it. Starting from Flask 1.0, we are able to register all our environment variables in a file and have it automatically imported when we run flask run command. To use this option, as you can see from the output above, we need to install the python-dotenv package:
(venv) $ pip3 install python-dotenv
Create a .flaskenv file in the application’s root directory (personal_blog folder) to hold all our environment variables:
(venv) $ touch .flaskenv
.flaskenv: Add all environement variables
FLASK_APP=practice_blog.py
Now, whenever you start your application, all you need to do is run flask run command. Doing this is optional. If you will prefer to set environment variables manually, it is perfectly okay. Just remember them.