Flask Web Forms
Table of Contents
In this series, I am going to guide you on how to create your very own blog! Yes, by the end of this tutorial, you will have a personal blog very much similar to this one up and running. If you so wish, you can use your new understanding to further customize it to make it more personal.
For your referrence, below is a list of the articles I have included in this series:
- Chapter 1: Hello, World!
- Chapter 2: Working with Templates
- Chapter 3: Flask Web Forms
- Chapter 4: Introduction to Database
- Chapter 5: Displaying User Comments
- Chapter 6: Styled Application
- Chapter 7: Working with Dates and Time
If you enjoy this article, please consider supporting my work and

The completed project used in this article can be referenced here.
In chapter 2, you learnt how to work with flask templates. In this chapter, I will show you how you can create flask web forms. Web forms are an integral part of a web application. We will use web forms to allow visitors of our blog to post comments on each article.
Introduction to WTForms
WTForms is a Python library that we will use to help render and validate forms. Flask has an extension called Flask-WTForms which help integrate Flask and WTForms. This is the first flask extension that we will use, among many more. Let us go ahead and install it in our virtual environment:
$ pip3 install flask-wtf
Let us create a config.py file in the application’s root directory.
$ touch config.py
This file will contain all the configurations we need for our applications. The very first configuration we will need is called the SECRET_KEY. This configuration variable will be used by Flask_WTform to help secure our forms against a nasty attack called CSRF (pronounced as ‘sea-surf’).
In our config.py file, let us update it to include this new security variable.
config.py: Add configuration variable
import os

class Config(object):
    SECRET_KEY=os.environ.get('SECRET_KEY') or 'you-cannot-guess-this'
As the name suggests, this should be secret, and should only be known to trusted maintainers of the application. The value of the SECRET_KEY is set to two, separated by the or operator. The first value is obtained from an envrionment variable called SECRET_KEY. If this value does not exist, then the application will use the value to the right of the or operator. This value can be anything. I have used you-cannot-guess-this for now.
At the moment, since we are developing the application, security concerns are low, hence the values used for the SECRET_KEY are sufficient. But upon deployment, I will set a hard-to-guess value for the SECRET_KEY to maximize on the application’s security.
With the config file in place, we need to register this configuration with the application. The application needs to read and apply it.
app/__init__.py: Apply flask configuration
from flask import Flask
from config import Config

app = Flask(__name__)
app.config.from_object(Config)

from app import routes
Notice that I am importing Flask (capital ‘F’) from flask (lower case ‘f’). flask (with a lower case) is the package name from which we get Flask. Similarly, I am importing Config(with uppercase ‘C’) from config (lower case ‘c’). config (with a lower case) is the module name available in our root directory (the config.py file). Config (with uppercase ‘C’) is the class name used in our config module. This may seem a bit confusing at first, but over time it will start to make sense.
Comments Form
Flask_WTF uses classes to represent web forms. A form class basically defines the fields we will use in a form.
Let us create a forms.py file in our app subfolder that we will use to define our form.
$ touch app/forms.py
app/forms.py: Define the comments form
from flask_wtf import FlaskForm
from wtforms import StringField, TextAreaField, SubmitField
from wtforms.validators import DataRequired, Email

class CommentForm(FlaskForm):
    username = StringField('Username', validators = [DataRequired()])
    email = StringField('Email', validators = [DataRequired(), Email()])
    comment = TextAreaField('Comment', validators = [DataRequired()])
    submit = SubmitField('Post')
Flask extensions conventionally use the format flask_<extension-name> during imports. Flask_WTF uses flask_wtf from which we import FlaskForm. All the four fields in our form are imported directly from the Flask-WTF package.
The validators argument is optional. We have used DataRequired to ensure that whenever a user wishes to post a comment, then they have to fill in each field that contain that value.
One of the validators used is Email. What this does is it ensures that the data filled in the email field is a valid email address. Flask cannot validate this on its own. We need to install another extension to use this validation.
$ pip3 install email-validator
Form Template
We have now defined how our form will be. The next step is to render this form in a comments template.
$ touch app/templates/comments.html
app/templates/comments.html: Render Comments form
<h3>Comments</h3>
<form action="" method="POST" novalidate>
    \{\{ form.hidden_tag() \}\}
    <p>
        \{\{ form.username.label \}\}<br>
        \{\{ form.username(size=32) \}\}
    </p>
    <p>
        \{\{ form.email.label \}\}<br>
        \{\{ form.email(size=32) \}\}
    </p>
    <p>
        \{\{ form.comment.label \}\}<br>
        \{\{ form.comment(size=64) \}\}
    </p>
    <p>
        \{\{ form.submit() \}\}
    </p>
</form>
# Remove the back slashes
I have intentionally not inherited the base template because I will include this comments.html file in other templates. To avoid double inheritence problems, it was necessary to not extend the base template. You will see how I will include this template in another template below.
The HTML <form> element is used to render web forms. I have used the action attribute to tell the browser which URL to submit the form when the submit button is clicked. When the value is set to empty, the URL to be used will be the one in the address bar, the one that rendered the form.
The HTTP method I want to use to submit the form data is POST. The default HTTP method to send the form is a GET request, but using the POST method provides for a better user experience such that the form data is submitted in the body of the form. When you use the GET method, the form fields are added to the URL, making it cluttered.
The novalidate tells the web browser not to apply any validation to the form fields.This now allows Flask to handle all form validation.
form.hidden_tag() is used to protect against CSRF attacks. It generates a hidden field that includes a token that enhance form protection. To protect a web form, all you have to do is to ensure you have the SECRET_KEY configured and the form.hidden_tag() used in the form. Flask_WTF does the rest for you.
\{\{ form.<field_name>.label \}\} is used to display the label of a field while \{\{ form.<field_name>(size=32) \}\} displays the actual field.
View Forms
The last step to render our forms will be to create a view function that will be responsible for displaying the forms. We want our form to be included in each article. So, we will go ahead and create a dummy article and attach the form at the bottom of it. First, let us define our article view function.
app/routes.py: Article view function
from flask import render_template
from app import app
from app.forms import CommentForm

#...
@app.route('/flask-webforms')
def flask_webforms():
    form = CommentForm()
    return render_template('flask_webforms.html', title = 'Flask Webforms', form = form)
We do not have this dummy article template. We need to create it so that our view function can render it.
$ touch app/templates/flask_webforms.html
app/templates/flask_webforms.html: First Article
{% extends 'base.html' %}

{% block content %}
    <h1>Flask Webforms</h1>
    <p>
        Lorem Ipsum is simply dummy text of the printing and typesetting industry.
        Lorem Ipsum has been the industry's standard dummy text ever since the 1500s,
    </p>
    <h3>Working with Flask Web Forms</h3>
    <p>
        Contrary to popular belief, Lorem Ipsum is not simply random text.
        It has roots in a piece of classical Latin literature from 45 BC,
        making it over 2000 years old. Richard McClintock, a Latin professor
        at Hampden-Sydney College in Virginia, looked up one of the more obscure
        Latin words, consectetur, from a Lorem Ipsum passage, and going through
        the cites of the word in classical literature, discovered the undoubtable source.
    </p><hr>
    {% include 'comments.html' %}
{% endblock %}
I have used the {\% include '<template.html>' \%} argument to incorporate the comments template in our article template.
With the article template in place, we can make it accessible to visitors of our blog by providing a link in the base template.
app/templates/base.html: Link to Article
<html>
    <head>
        {% if title %}
            <title>
                Gitau Harrison | \{\{ title \}\} # Remove the back slashes
            </title>
        {% else %}
            <title>
                Welcome to my Personal Blog
            </title>
        {% endif %}
    </head>
    <body>
        <div>
            Gitau Harrison: <a href="/home">Home</a>
        </div>
        <div>
            <ul>
                <li><a href="/flask-webforms">Flask Webforms Link<a></li>
            </ul>
        </div>
        {% block content %}

        {% endblock %}
    </body>
</html>
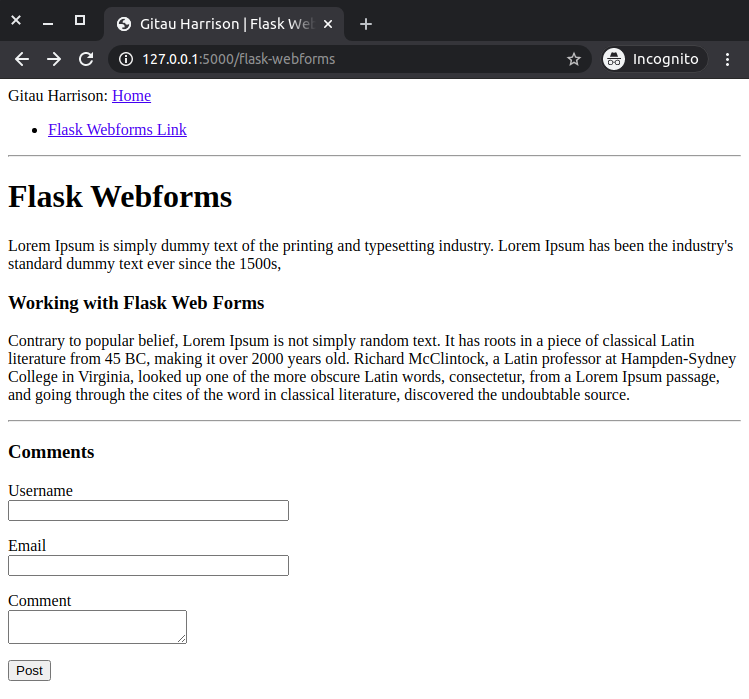
At this point, you can run the application. You should be able to see the Flask Webforms Link on your localhost. Click on the link to see your article with a comments form included at the bottom. Pretty cool, right?
Receive Form Data
If you try to press the Post button, you will see:
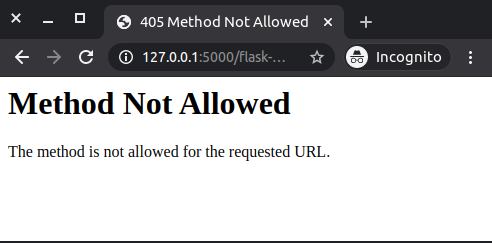
This is because our previous view function does only half the job. We need to be able to process the data that has been submitted through our form.
app/routes.py: Receive form data
from flask import render_template, redirect, flash
#...previous imports

#...
@app.route('/flask-webforms', methods = ['GET', 'POST'])
def flask_webforms():
    form = CommentForm()
    if form.validate_on_submit():
        flash('{}\'s comment is now live!'.format(form.username.data))
        return redirect('/flask_webforms')
    return render_template('flask_webforms.html', title = 'Flask Webforms', form = form)
The first update is the methods argument in the decorator route. This tells Flask that the view function accepts both GET and POST requests, overiding the default, which is to accepts only GET requests. POST requests are primarily used to submit form data to the server, although GET requests can also do the same but it is not recommended.
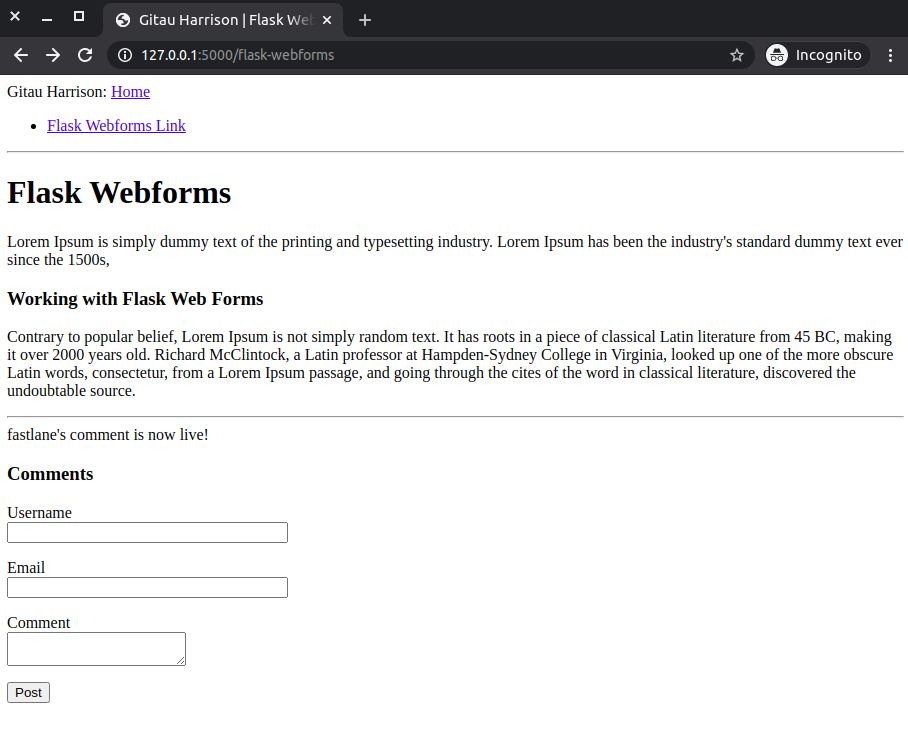
form.validate_on_submit() method is used to handle form processing. When the browser sends a GET request, the method will return False, and therefore skip the form validation and render only the html page. If the browser returns a POST request due to a user clicking on the Post button, the method will gather the user’s username and run all validation. If everything is okay, then it will return True, flash a message on the screen and redirect the request to the /flask_webforms route.
Message flashing is quite popular. A lot of websites implement this. This feature provides the user with useful feedback about the status of their actions. Flashed messages, however, do not applear magically. The application’s templates need to render this messages.
We will add a flashed messages template and include it in our article page.
$ touch app/templates/flashed_messages.html
app/templates/flashed_messages.html: Flash messages
{% with messages = get_flashed_messages() %}
    {% if messages %}
        {% for message in messages %}

        {% endfor %}
    {% endif %}
{% endwith %}
get_flashed_messages() from flask is used to return all the registered flash messages. We assign all these messages to messages using the with construct. If messages exist, then we loop through all those registered messages and display each one of them that is available. These messages are requested once using get_flashed_messages(), then they are removed from the messages list. They will appear only once in the flash command.
We will add these flash messages to our article template right before the comments section, such that whenever a successful post is made, the flashed message will appear on top of the comments section only.
app/templates/flask_webforms.html
{% extends 'base.html' %}

{% block content %}
    <h1>Flask Webforms</h1>
    <p>
        Lorem Ipsum is simply dummy text of the printing and typesetting industry.
        Lorem Ipsum has been the industry's standard dummy text ever since the 1500s,
    </p>
    <h3>Working with Flask Web Forms</h3>
    <p>
        Contrary to popular belief, Lorem Ipsum is not simply random text.
        It has roots in a piece of classical Latin literature from 45 BC,
        making it over 2000 years old. Richard McClintock, a Latin professor
        at Hampden-Sydney College in Virginia, looked up one of the more obscure
        Latin words, consectetur, from a Lorem Ipsum passage, and going through
        the cites of the word in classical literature, discovered the undoubtable source.
    </p><hr>
    {% include 'flashed_messages.html' %}
    {% include 'comments.html' %}
{% endblock %}
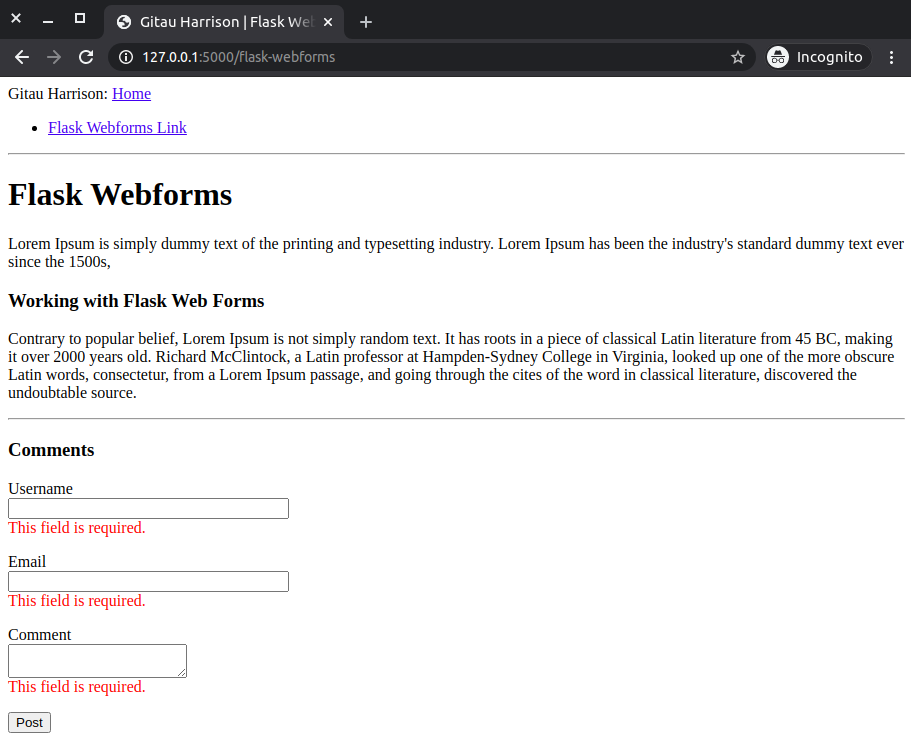
Test the application now, by submitting an empty form to see how DataRequired works.
Improve Field Validation
The way our form works to handle invalid user information submitted through our form is by rendering the form to the user again to put in better data. You will agree with me that there is no way a user of our current form will know whether the data they put in is valid or invalid. Our form has no way to show this. To improve the user experience at the form, we will add some field validation.
<h3>Comments</h3>
<form action="" method="POST" novalidate>
    \{\{ form.hidden_tag() \}\}
    <p>
        \{\{ form.username.label \}\}<br>
        \{\{ form.username(size=32) \}\}<br>
        {% for error in form.username.errors %}
            <span style="color: orangered;">  </span>
        {% endfor %}
    </p>
    <p>
        \{\{ form.email.label \}\}<br>
        \{\{ form.email(size=32) \}\}<br>
        {% for error in form.email.errors %}
            <span style="color: orangered;">  </span>
        {% endfor %}
    </p>
    <p>
        \{\{ form.comment.label \}\}<br>
        \{\{ form.comment(size=64) \}\}<br>
        {% for error in form.comment.errors %}
            <span style="color: orangered;">  </span>
        {% endfor %}
    </p>
    <p>
        \{\{ form.submit() \}\}
    </p>
</form>
# Remove the back slashes
The only change I have made to the form is to include {\% for error in form.<fieldname>.errors \%}<span style="color: orangered;"> \{\{ error \}\} </span>{\% endfor \%}. This will render the error messages added by the validators in orangered color. This time round, if you try to submit data with the field forms being empty, you will see an error message appear below each field in orangered color.
Writing Better Links
One problem with writing actual links in our code is that if one day we decide to change a couple of things, chances are we will have to go and look for each link wherever it could be and change it. This is cumbersome and it becomes even more cumbersome and error-prone when the application becomes bigger.
To have better control over these links, we’d rather use their view function name instead of URLs. Flask provides a function called url_for() which maps URLs to view functions. For example, url_for('about_me') returns the /about-me URL. The argument in url_for() is the endpoint whose name is the view function name.
From now on, I will be using url_for every time I want to generate URLs. Meanwhile, we will change all URLs in our current application.
app/templats/base.html: Use view function name when generating links
<html>
    <head>
        {% if title %}
            <title>
                Gitau Harrison | \{\{ title \}\}
            </title>
        {% else %}
            <title>
                Welcome to my Personal Blog
            </title>
        {% endif %}
    </head>
    <body>
        <div>
            Gitau Harrison: <a href="\{\{ url_for('home') \}\}">Home</a>
        </div>
        <div>
            <ul>
                <li><a href="\{\{ url_for('flask-webforms') \}\}">Flask Webforms Link<a></li>
            </ul>
        </div>
        {% block content %}

        {% endblock %}
    </body>
</html>
# Remove the back slash
app/routes.py: Use view function names when generating links
from flask import render_template, redirect, flash
    #...previous imports

#...
@app.route('/flask-webforms', methods = ['GET', 'POST'])
def flask_webforms():
    form = CommentForm()
    if form.validate_on_submit():
        flash('{}\'s comment is now live!'.format(form.username.data))
        return redirect(url_for('flask_webforms'))
    return render_template('flask_webforms.html', title = 'Flask Webforms', form = form)