Working with Databases
Table of Contents
In this series, I am going to guide you on how to create your very own blog! Yes, by the end of this tutorial, you will have a personal blog very much similar to this one up and running. If you so wish, you can use your new understanding to further customize it to make it more personal.
For your referrence, below is a list of the articles I have included in this series:
- Chapter 1: Hello, World!
- Chapter 2: Working with Templates
- Chapter 3: Flask Web Forms
- Chapter 4: Introduction to Database
- Chapter 5: Displaying User Comments
- Chapter 6: Styled Application
- Chapter 7: Working with Dates and Time
If you enjoy this article, please consider supporting my work and

The completed project used in this article can be referenced here.
In this chapter, I will introduce the important concept of databases. We will use a database to store all user information that we get through our forms. Data in a database is typically persistent and can be retrieved when needed. What I mean is when we close our application and reopen it, we do not have to worry that any user data will be lost. Our database safely stores these data.
Flask Databases
Flask supports a number of databases with no particular preference. It is intentionally unopinionated, which provides us with the freedom to choose whichever database we want to use. Despite the support for databases, Flask does not support them natively.
Databases can be grouped into two broad categries: relational databases and those that are not relational. Those that do not follow any relational model are called NoSQL, meaning they do not implement the relational query language SQL. For applications that have structured data such as a list of users, or blog comments, relational databases are much better and more recommended. NoSQL databases do much better with data that is less structured. For this reason, we will learn how to implement relational databases for our blog.
We will use SQLAlchemy. It is an Object Relational Mapper where classes can be mapped to a database to develop a clean database schema. SQLAlchemy supports a number of popular database engines, including MySQL, PostrgeSQL and SLQLite. This is super convinient because as you develop your application, you can use a serverless database such as SQLite and upon production, you can easily switch to a more robust database engine such as Postgre without having to change your application.
Flask has a couple of extensions that will help us work with databases. In this chapter, I will introduce two to you:
When a database is created, it will not stay empty. Data will fill it. This means that our database will need to be constantly updated with new changes. So, with a relational database, when this change takes place, we need to migrate our current schema to the new modified structure.
Let us go ahead and install both extensions in our virtual environment:
$ pip3 install flask-sqlalchemy
$ pip3 install flask-migrate
SQLite does not need to run any server. Additionally, since our application is still very small, this database engine is most appropriate for our use. For these two reasons, we will use it in our application. Let us add some configurations to our config module:
config.py: Add configurations
import os
basedir = os.path.abspath(os.path.dirname(__file__))

class Config(object):
    #...
    SQLALCHEMY_DATABASE_URI=os.environ.get('DATABASE_URL') or \
        'sqlite:///' + os.path.join(basedir, 'app.db')
    SQLALCHEMY_TRACK_MODIFICATIONS=False
We are taking the location of the database from the environment variable DATABASE_URL. If this does not exist, we provide a safety net where we configure our database called app.db in the main directory of our application, which is stored in the variable basedir.
Every time a change is made to the database, we will get a signal to our application. We do not need this signals every time we make changes to our database for now. So, I have set SQLALCHEMY_TRACK_MODIFICATIONS to False.
As done in the previous chapter, we need to register our database in the application instance.
app/__init__.py: Initialize database in application
from flask import Flask
from config import Config
from flask_sqlalchemy import SQLAlchemy
from flask_migrate import Migrate

app = Flask(__name__)
app.config.from_object(Config)
db = SQLAlchemy(app)
migrate = Migrate(app, db)

from app import routes, models
We have imported our models into the application instance.
Database Models
Our database models will be defined by classes. The ORM layer will do the translation of our classes into rows in the proper database tables. Let us think about the data we want to add to our database. Our form collects a visitor’s username, email and comment. These are the data we are interested in, and they are the ones that will go into our database. The table below will show how the User table in our database will look like.
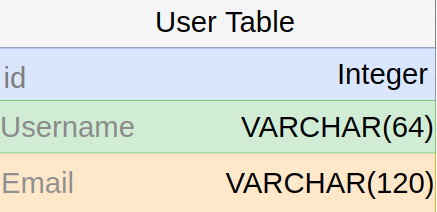
id field is usually in all models. It is used as a primary key. This field is automatically assigned a unique id value.
The Username and Email fields are defined by us. The type of data they hold is string (or VARCHAR in database jargon). Each of this field has a maximum length defined to optimize on storage space.
Now that we know what we want for our user table, we can code it in our models module. Since we do not have it yet, let us go ahead and create an empty models.py file in our app directory:
$ touch app/models.py
Add this code below to define our models structure/schema:
app/models.py: User schema
from app import db

class User(db.Model):
    id = db.Column(db.Integer, primary_key=True)
    username = db.Column(db.String(64), index=True)
    email = db.Column(db.String(120), index=True)

    def __repr__(self):
        return 'User <>'.format(self.username)
Our User class inherites a base class called db.Model which is used for all models in Flask-SQLAlchemy. The class defines several fields as variables of the instance db.Column.
The __repr__ method tells Python how to print the objects of the User class. This method is especially useful when we want to debug our code. I will show you how to use the method in the Python interpreter.
$ python3
>>> from app.models import User
>>> u = User (username = 'Gitau', email = 'harry@email.com')
>>> u.username

# Output
'Gitau'
Our output is as a result of __repr__ returning it as we had defied it above.
Create Migration Repository
Alembic, a database migration framework for SQLAlchemy, maintains a migrations repository which stores all migrations scripts. Every time our database changes, a migration script needs to be generated to indicate the new schema/structure of the modified model. These new scripts are stored in the aforementioned migrations repository. Now that we have our database structure set up, we need to create a migrations script which defines our new User model. Flask-migrate helps us to manage all our migrations needs. Run the command below to generate a migrations repository:
$ flask db init

# Output
Creating directory /home/gitau/software_development/python/flask_tutorial/personal_blog_tutori
    al_project/migrations ...  done
    Creating directory /home/gitau/software_development/python/flask_tutorial/personal_blog_tutori
    al_project/migrations/versions ...  done
    Generating /home/gitau/software_development/python/flask_tutorial/personal_blog_tutorial_proje
    ct/migrations/alembic.ini ...  done
    Generating /home/gitau/software_development/python/flask_tutorial/personal_blog_tutorial_proje
    ct/migrations/script.py.mako ...  done
    Generating /home/gitau/software_development/python/flask_tutorial/personal_blog_tutorial_proje
    ct/migrations/env.py ...  done
    Generating /home/gitau/software_development/python/flask_tutorial/personal_blog_tutorial_proje
    ct/migrations/README ...  done
    Please edit configuration/connection/logging settings in '/home/gitau/software_development/pyt
    hon/flask_tutorial/personal_blog_tutorial_project/migrations/alembic.ini' before proceeding.
Check your roote folder. The migrations subfolder that has been created should be part of your application from now henceforth, and you need to commit it to version control.
First Migration
Let us now add a User table that maps the User model in our database. We will use flask db migrate command to automatically generate our table:
$ flask db migrate -m 'user table'

# Output
INFO  [alembic.runtime.migration] Context impl SQLiteImpl.
INFO  [alembic.runtime.migration] Will assume non-transactional DDL.
INFO  [alembic.autogenerate.compare] Detected added table 'user'
INFO  [alembic.autogenerate.compare] Detected added index 'ix_user_comment' on '['comment']'
INFO  [alembic.autogenerate.compare] Detected added index 'ix_user_email' on '['email']'
INFO  [alembic.autogenerate.compare] Detected added index 'ix_user_username' on '['username']'
    Generating /home/gitau/software_development/python/flask_tutorial/personal_blog_tutorial_project/migrations/versions/e3ed68135fa1_user_table.py ...  done
You will notice two things:
app.dbhas been created...user_table.pyfile in migrations/versions has also been created
The migration script ...user_table.py is also part of your project and will need to be added to version control. flask db migrate does not make any changes to our database, it only generates a migrations script. What we need to do to apply these changes to our database is to run the flask db upgrade command:
$ flask db upgrade

# Output
INFO  [alembic.runtime.migration] Context impl SQLiteImpl.
INFO  [alembic.runtime.migration] Will assume non-transactional DDL.
INFO  [alembic.runtime.migration] Running upgrade  -> e3ed68135fa1, user table
SQLite thankfully creates a database for us (the app.db file). However, when working with PostgreSQL or MySQL, you will need to create the database in the database server before running upgrade.
There is also the flask db downgrade command which returns the state of our database to a previous version. We won’t use it at this point because we have no need to downgrade anything.
In summary, to create and apply changes to your database, all you need to do is run these commands in order:
$ flask db init # Only run once
$ flask db migrate -m '<your new changes>'
$ flask db upgrade
Relationships in Database
Visitors to our blog will do one thing: post comments. The way we have set up our database allows for one visitor to post multiple comments using the same credentials. I mean, a user called ‘Harry’ can use the username ‘Harry’ and his email ‘harry@email.com’ to post several comments without running the risk of our application rejecting his subsequent comments.
Here is the thing: in our database scenario, each comment belongs to a specific user. In other words a visitor of our blog who decides to leave a comment owns his or her comment. The most efficient way we can record this scenario is by visualizing two records.
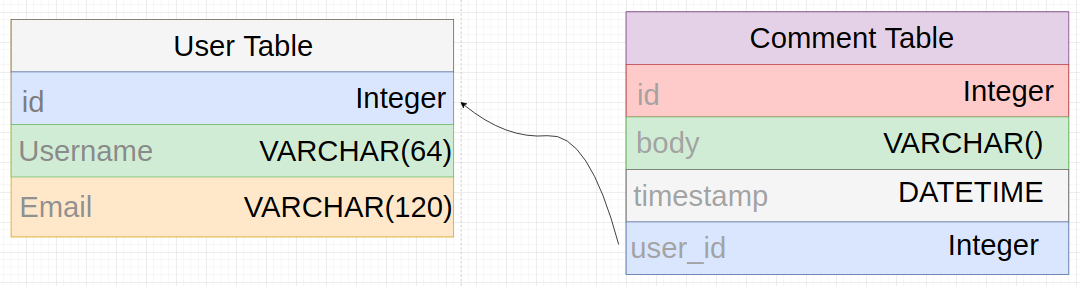
Our Comment Table has id, comment, timestamp and user_id fields. The user_id field links the Comment Table with the User Table. It is referred to as a foreign key. This key is of type integer.
The kind of relationship we are seeing here is a one-to-many relationship. One user can write many comments. We need to show this relationship in our models.py file:
models.py: Models relationships
from app import db
from datetime import datetime

class User(db.Model):
    id = db.Column(db.Integer, primary_key=True)
    username = db.Column(db.String(64), index=True)
    email = db.Column(db.String(120), index=True)
    comments = db.relationship('Comment', backref='author', lazy='dynamic')

    def __repr__(self):
        return 'User <>'.format(self.username)

class Comment(db.Model):
    id = db.Column(db.Integer, primary_key=True)
    body = db.Column(db.String(), index=True)
    timestamp = db.Column(db.DateTime, index=True, default=datetime.utcnow)
    user_id = db.Column(db.Integer, db.ForeignKey('user.id'))

    def __repr__(self):
        return 'Body <>'.format(self.body)
The timestamp field will be responsible for showing what time a user made a comment. It uses the standard utcnow time convention. It is recommended that utc be used rather than the local time zone. Imagine visitors of your blog reside in different timezones. To manage each visitor’s timezone in our application can be a hectic task. Instead, we resort to using the conventional utc which is a standard time conversion.
When you pass a function as a default, SQLAlchemy will set the field to the value of calling that function. Note that I am using utcnow and not the result of calling utcnow(). I have excluded the () because using it will give us the result of that function. We do not want to pass the result of the function to our field, rather we let SQLAlchemy do that using the argument default.
As earlier mentioned, user_id in Comment Table is a foreign key. To declare it in our Comment model, we use db.ForeignKey(), for which SQLAlchemy user lowercase letters. If the word is multi_worded, then the snake_case convention is applied.
We referrence the Comment Table in the User Table using db.relationship. The first argument in db.relationship is the name of the table we are referrencing, in this case it is the Comment Table. It is used conventionally on the ‘one’ side of the relationship to referrence the ‘many’ side of the same relationship.
The backref will return the user as the author of the comment while lazy defines how the database query for the relationship will be issued.
With these updates to our database, we need to apply them by running these commands:
$ flask db migrate -m 'comment table'
$ flask db upgrage
Testing
At this point, we have our database set up. But it is empty. To test it’s functionality, we need to input some data. In this section, you will learn how to work with the database itself and the data it contains. Make sure you are in the interactive shell.
$ python3

>>> from app import db
>>> from app.models import User, Comment
Let us add a user:
>>> u =  User(username = 'gitau', email = 'gitau@email.com')
>>> db.session.add(u)
>>> db.session.commit()
Changes to a database are done is sessions. You can accululate multiple changes and then commit them to the database once. If at one point you get an error, you can do db.session.rollback() to abort the session and remove any changes from the session.
Let us add another user:
>>> u =  User(username = 'harry', email = 'harry@email.com')
>>> db.session.add(u)
>>> db.session.commit()
We can query our database to return all users:
>>> users = User.query.all()
>>> for u in users:
...    print(u.id, u.username)

# Output
1 gitau
2 harry
If you know the id of a user, you can retrieve that use as seen below:
>>> u = User.query.get(1)
>>> u.username

# Output
'gitau'
>>> u.email
# Output
'gitau@email.com'
Adding a user comment is similar to adding the user:
>>> c = Comment(body = 'this is a comment', author = u)
>>> db.session.add(c)
>>> db.session.commit()
To retrieve all comments, all we need to do is to query the Comment Table:
>>> comments = Comment.query.all()
>>> for c in comments:
...     print(c.id, c.author.username, c.body)
...
# Output
1 gitau this is a comment
That was fun! Let us restore our database to a clean slate now:
>>> users = User.query.all()
>>> for u in users:
...     db.session.delete(u)
...
>>> comments = Comment.query.all()
>>> for c in comments:
...     db.session.delete(c)
...
>>> db.session.commit()
What is Shell Context
Above, we have had to manually run our imports. Probably you have noticed that whenever you exit the Python interpreter, you had to start all over again. Your session is discarded and not remembered every time you restart your shell prompt. This is what we had to do all the time:
$ python3

>>> from app import db
>>> from app.models import User, Comment
Thankfully, flask offers a solution to this rather tedious task. The flask command offers flask shell whose sole purpose is to start a Python interpreter in the context of our application. Check this out:
$ python3

>>> app

# Output
Traceback (most recent call last):
    File "<stdin>", line 1, in <module>
NameError: name 'app' is not defined
>>>
This is when we start our Python interpreter the normal way. We get an error that app is not defined in our application. Is that true? Definitely no!
$ flask shell

Python 3.8.5 (default, Jul 28 2020, 12:59:40)
[GCC 9.3.0] on linux
App: app [development]
Instance: /home/gitau/software_development/python/flask_tutorial/personal_blog_tutorial_project/instance
>>>app

# Output
<Flask 'app'>
This time round, the interpreter pre-imports app in the context of our application. We have no error. Very convinient, right?
We can configure the shell context to preimport whatever else we want. This is done in the personal_blog.py file.
personal_blog.py: Configure the shell context
from app import app, db
from app.models import User, Comment

@app.shell_context_processor
def make_shell_context():
    return { 'db': db, 'User': User, 'Comment': Comment }
Now, when flask shell command runs, it will invoke the make_shell_context() function and register the items returned by it in the shell session. Let us test flask shell out:
$ flask shell

>>> db
# Output
<SQLAlchemy engine=sqlite:////home/gitau/software_development/python/flask_tutorial/personal_blog_tutorial_project/app.db>
>>> Comment
# Output
<class 'app.models.Comment'>