Displaying User Comments
Table of Contents
In this series, I am going to guide you on how to create your very own blog! Yes, by the end of this tutorial, you will have a personal blog very much similar to this one up and running. If you so wish, you can use your new understanding to further customize it to make it more personal.
For your referrence, below is a list of the articles I have included in this series:
- Chapter 1: Hello, World!
- Chapter 2: Working with Templates
- Chapter 3: Flask Web Forms
- Chapter 4: Introduction to Database
- Chapter 5: Displaying User Comments
- Chapter 6: Styled Application
- Chapter 7: Working with Dates and Time
If you enjoy this article, please consider supporting my work and

The completed project used in this article can be referenced here.
Our Comment model has a timestamp field. In chapter 5, we saw how we can display a user's username and comment body. What we need to do now is display the time a comment was made in a user post.
Understanding Dates and Time in Python
Python has a datetime module which supplies classes for manipulating dates and times. We will work with a few examples to understand how datetime works. To get started, activate your interpreter by typing python3 in your terminal.
>>> import datetime
>>> datetime_object = datetime.datetime.now()
>>> print(datetime_object)
#Output
2020-11-22 05:45:58.883645
We have imported the datetime module. We then use one of the classes in datetime module called datetime and add now() method to create a datetime object containing the current local date and time.
If we want to get only the date, then we will do:
# Do not close the interpreter, if you do, you will need to import datetime again
# Below, I am not importing datetime because my interpreter session is still active
>>> datetime_object = datetime.date.today()
>>> print(datetime_object)
#Output
2020-11-22
We have used today() method defined in the date class to get a date object containing the current local date.
>>> d = datetime.date(2020, 11, 22)
>>> print (d)
# Output
2020-11-22
date() is a constructor of the date class. The constructor takes three arguments: year, month, day. Use this if you want to create a specific date.
To be more specific in retrieving either the year, the month or the day, we will do:
>>> from datetime import date

>>> today = date.today()
>>> print('Current year: ', today.year)
# Output
Current year:  2020
>>> print('Current month: ', today.month)
# Output
Current month:  11
>>> print('Current day: ', today.day)
# Output
Current day:  22
Let us now see how we can get the time object.
>>> from datetime import time

>>> t = time()
>>> print('t = ', t)
# Output
>>> t =  00:00:00

>>> q = time(6, 7, 30)
>>> print('q = ', q)
# Output
q =  06:07:30
You get the idea. Using the time class, you can create a time object.
>>> from datetime import datetime,date
>>> t1 = date(year = 2020, month = 11, day = 22)
>>> t2 = date(year = 2019, month = 10, day = 13)
>>> t3 = t1 - t2
>>> print('t3 = ', t3)
# Output
t3 =  406 days, 0:00:00
It is also possible to get the difference between two dates and times as seen below:
>>> from datetime import timedelta
>>> t1 = timedelta(weeks = 4, days = 5, hours = 10, seconds = 10)
>>> t2 = timedelta(days = 7, hours = 2, minutes = 21, seconds = 34)
>>> t3 = t1 - t2
>>> print('t3 = ', t3)
# Output
t3 =  26 days, 7:38:36
We have created two timedelta objects and printed their difference. For more authoritative information on the Python datetime module, check the python documentation.
At this point, you are fairly familiar with how to use time and date in Python. But there is one more thing I would like to discuss: time zones. We know that their is an obvious possibility that the visitors of our blog may be living in different time zones. We want our blog to be able to generate consistent timestamps regardless of the fact that users of our blog may be living in different time zones.
To understand the effect of timezone, I will show you how we are affected by it below:
>>> from datetime import datetime
>>> str(datetime.now())
# Output
'2020-11-22 06:25:15.366203'
If another user who is an a different time zone from mine runs the codes above, the output will be different. This is due to the concept to time zones. So how do we ensure consistency in our time?
>>> str(datetime.utcnow())
# Output
'2020-11-22 03:27:03.055821'
Regardless of timezones, any user who runs the code above will get the same output. datetime.utcnow() will always return the same time, regardless of location. UTC is the most used uniform timezone and is supported in the datetime class. You saw me implement this in chapter 4 while creating the timestamp field in the Comment model. This was to ensure consistency in the time implemented by our blog.
While standardizing timestamps to UTC makes a lot of sense from the server's point of view, this creates a usability problem for users. I am in Nairobi and the current time here is 06:25:15. However, UTC returns 03:27:03. This means that I have to do the calculation of my actual time. Every visitor of our blog will have to do the same. Below, I will address this challenge while still maintaining a standardized time in our server.
Moment.js
Moment.js is an open source Javascript library that helps in formating time and date. I am going to use this to help solve the issue with user time. To use it in our flask application, we will need to install the Flask extension associated with it:
# Remember to activate your virtual environment when installing packages
$ pip3 install flask-moment
We need to register this extension in our application
app/__init__.py: Register flask-moment instance
# ...
from flask_moment import Moment

app = Flask(__name__)
# ...
moment = Moment(app)
Moment.js is a Javascript library, and to use it, we need to add this script to our template so as to make it available. Thankfully, Flask-Moment makes it easier to do this, by exposing moment.include_moment() function that generates the <script> tag.
app/templates/base.html: Add moment.js in base template
# Remove back slashes

{% block scripts %}
    \{\{ super \}\}
    \{\{ moment.include_moment() \}\}
{% endblock %}
Flask-Bootstrap expects us to use the scripts block since it is the place where all JavaScript imports are to be included. The special thing with this block unlike the rest is we need to use super(). super() helps to preserve the content in the base template, without which all your base content definitions will be lost.
Using Moment.js
Moment.js uses the ISO 8601 format to render timestamps, The format is as follows:
# Remove back slashes

\{\{ year \}\}-\{\{ month \}\}-\{\{ day \}\}T\{\{ hour \}\}:\{\{ minute \}\}:\{\{ second \}\}\{\{ timezone \}\}
The last part will always be a Z which represents the UTC timezone that I want to work with in ISO 8601 format.
Moment.js has multiple methods for different rendering options:
moment('2020-11-22T10:10:10Z').format('L')
# Output
"11/22/2020"

moment('2020-11-22T10:10:10Z').format('LL')
# Output
"November 22, 2020"

moment('2020-11-22T10:10:10Z').format('dddd')
# Output
"Sunday"

moment('2020-11-22T10:10:10Z').calendar('dddd')
# Output
"Today at 10:10 AM"
Learn more about the different rendering options of Moment.js here.
We will include a properly formated timestamp next to a user's name when posting a comment.
app/templates/_user_comments.html: Render timestamp
# Remove back slashes

<table>
<tr valign="top">
    <td><img src="\{\{ post.author.avatar(36) \}\}"></td>
    <td>\{\{ post.author.username \}\} said \{\{ moment(post.timestamp).fromNow() \}\}:<br>
        \{\{ post.body \}\}</td>
</tr>
</table>
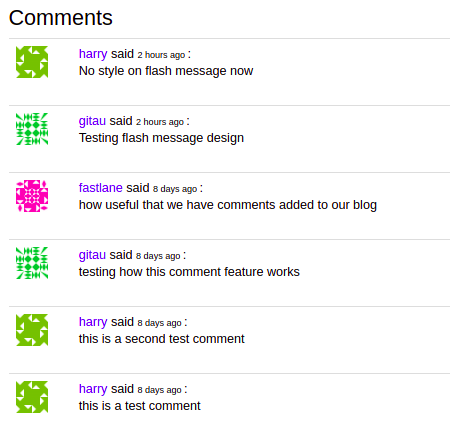
Below, you can see how the comments timestamp looks like when rendered with Flask-Moment and moment.js
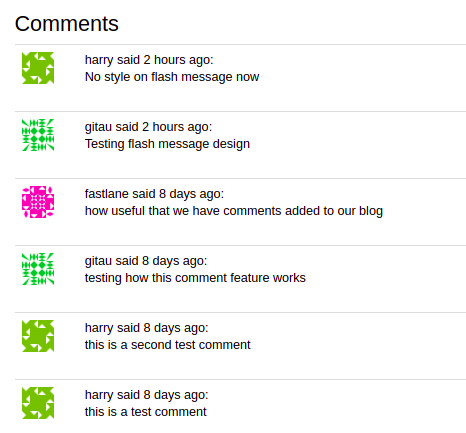
Impresssive, right! To make it stand out a bit, I can style both the username and the timestamp as seen below:
app/templates/_user_comments.html: Improved Comment Styles
# Remove back slashes

<table class="table table-hover">
    <tr valign="top">
        <td width="70px">
            <img src="\{\{ post.author.avatar(36) \}\}">
        </td>
        <td>
            <span style="color: #482ff7">
                \{\{ post.author.username \}\}
            </span>
                said
                <span style=" font-size: 10px;">
                    \{\{ moment(post.timestamp).fromNow() \}\}
                </span>:<br>
            \{\{ post.body \}\}</td>
    </tr>
</table>